How To Setup Virtual Environments for Python Development
When developing software with Python, it's very common to install additional packages and libraries in order to run some script or perhaps a notebook.
However, when we install those packages and libraries, they are globally installed for all of our projects. For large projects, this could be hundreds of packages or more. Installing these packages globally when they are only needed for a single project adds additional complexity and increases the likelihood of a package change breaking some code unintentionally.
To avoid this, most Python developers use virtual environments to isolate projects from each other. Instead of installing all of the packages globally, we create a virtual environment for each project that we would like to work on, and install the required packages within that virtual environment. When we want to run the code, we activate the virtual environment, do what we need to do, and when finished, deactivate the virtual environment.
This tutorial will cover the steps necessary for setting up and managing virtual environments using the virtualenv tool and virtualenvwrapper shell functions.
What is a Virtual Environment?
Virtual environments are self-contained Python environments associated with a python project. These virtual environments have their own installed version of packages, and are used to isolate the packages installed for a project from each other.
When you activate a virtual environment, your Python interpreter changes, the installed packages you are using change, and associated scripts and tools (such as pip) have their own version within the virtual environment.

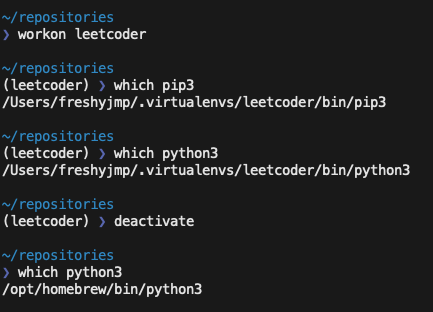
As shown in the image above, when we activate a virtual environment (using the workon shell function), we get a new pip3, a new python3, and will have a different site_packages folder that holds all of the packages we install. When we're done, we can deactivate the virtual environment and return to using our globally-installed Python interpreter and packages.
Why should I use virtual environments?
The value of virtual environments is made clear to any developer who attempts to download a project written in Python or start a new project from scratch.
- Your development environment doesn't interfere with your system installed Python environment
- You can support multiple different Python versions
- You can download and install packages without using admin (root) permissions
- Because your application requirements are scoped to the virtual environment, your application can be more easily shared with others or deployed to a production environment elsewhere
How do I set up a virtual environment?
To get started with using virtual environments, you need to install two python packages - this can be accomplished through pip/pip3 or through Homebrew or another package manager.
Install virtualenv
- Install virtualenv
pip3 install virtualenv
// or
brew install virtualenv
Install virtualenvwrapper
- Install virtualenvwrapper
pip3 install virtualenvwrapper
// or
brew install virtualenvwrapperIn order for virtualenvwrapper functions to get loaded and work correctly, we need to set some environment variables in our shell's rc file. Add the following lines to your .bashrc or .zshrc file.
# virtualenvwrapper related

# Can be anywhere, but putting within home directory is ideal
export WORKON_HOME=$HOME/.virtualenvs

# Set to Global Python
export VIRTUALENVWRAPPER_PYTHON=/opt/homebrew/bin/python3

# Set to Global Python
export VIRTUALENVWRAPPER=/opt/homebrew/bin/virtualenv

# Important! virtualenvwrapper functions must be added to shell!
source /opt/homebrew/bin/virtualenvwrapper.sh
Create first virtual environment
Creating a virtual environment is now easy! Ensure that you've sourced virtualenvwrapper.sh in your current shell (or load a new one) and run:
mkvirtualenv <whatever name you wish> -p python3This will create the virtual environment in your WORKON_HOME directory, as shown below:

Finishing up
Once the environment is created, you can activate it using:
workon <environmentname>
If you don't remember the virtual environment names, you can simply use workon and a list of virtual environments you can use will be listed.
Once activated, you can use pip install ... as you normally would to install packages. When done working on the virtual environment, you can use deactivate to leave the virtual environment.
Working with virtual environments in Visual Studio Code
VS Code provides native support for virtualenvwrapper. As long as your WORKON_HOME environment variable is set, VS Code will look in that directory for interpreters to use when working on a Python project.
To set an interpreter, open the command palette in VS Code:

After selecting the Python: Select Interpreter option, you'll have a list of the virtual environments you can use.

Conclusion
Virtual environments are essential for local python development. After completing this walkthrough, you will have a clean workflow for activating and deactivating virtual environments that has full VS Code integration.
